

Lesson Plan | Roger Brown: Split Fountain Printmaking – MMoCA

Artwork
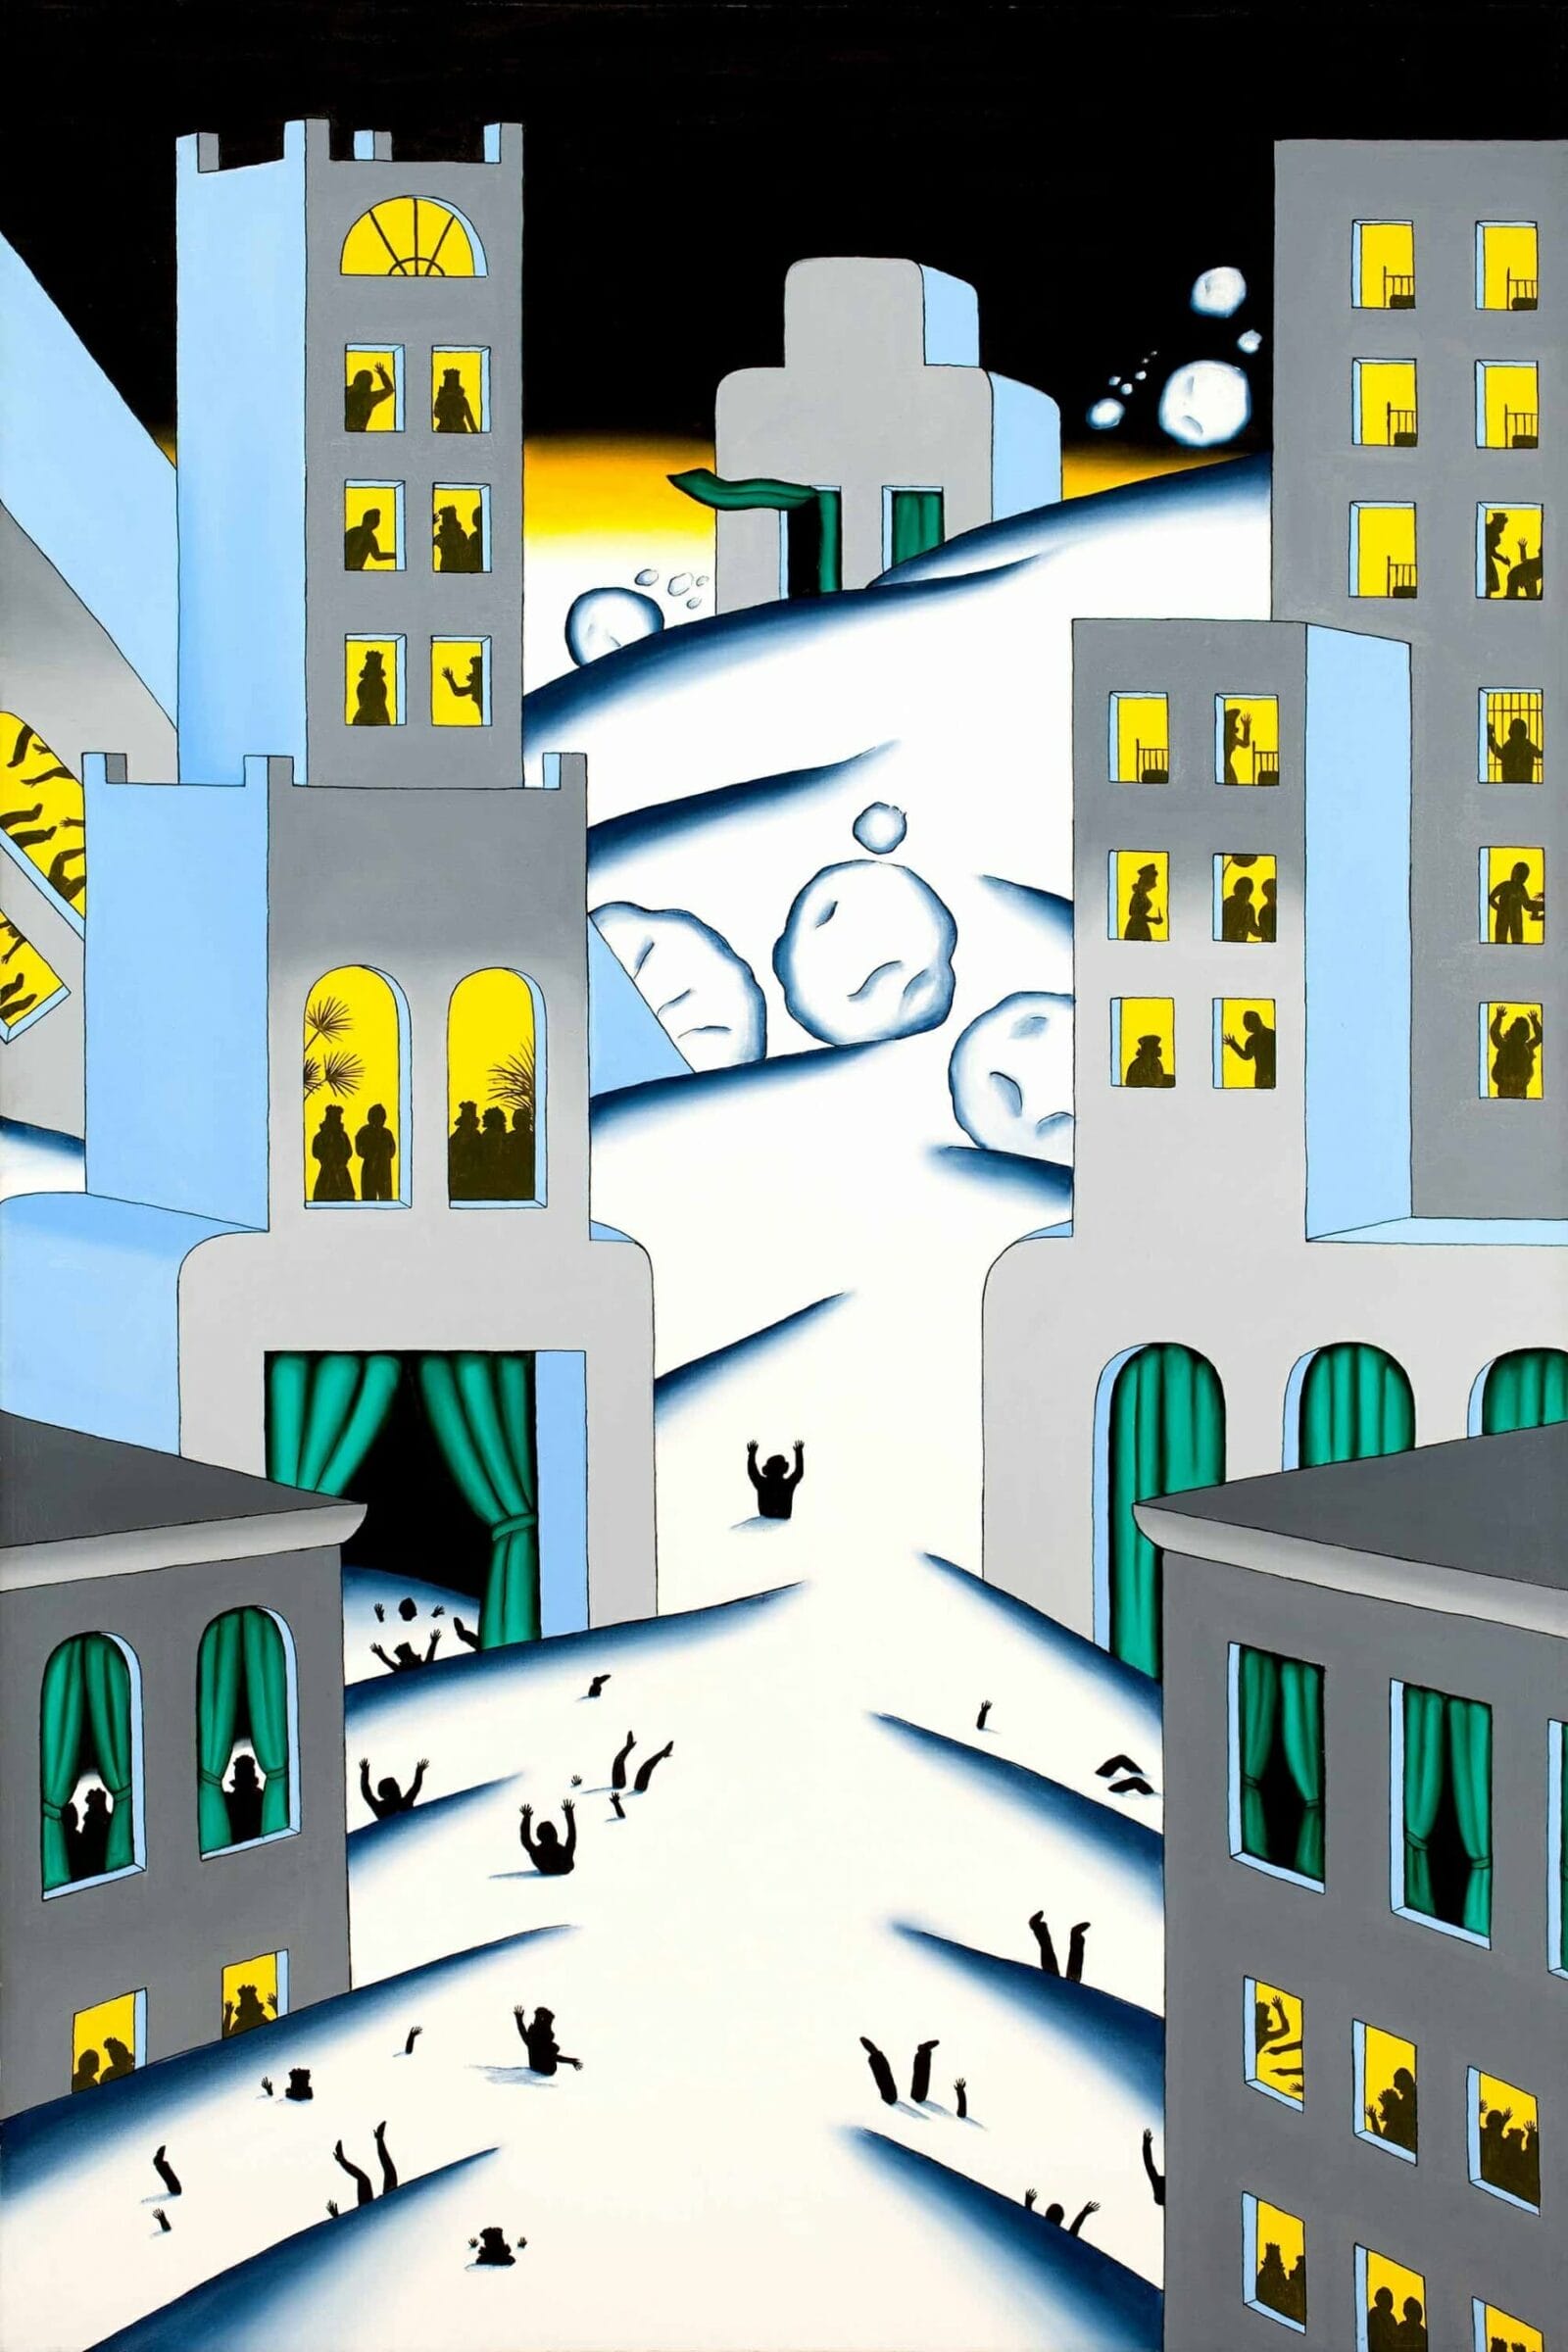
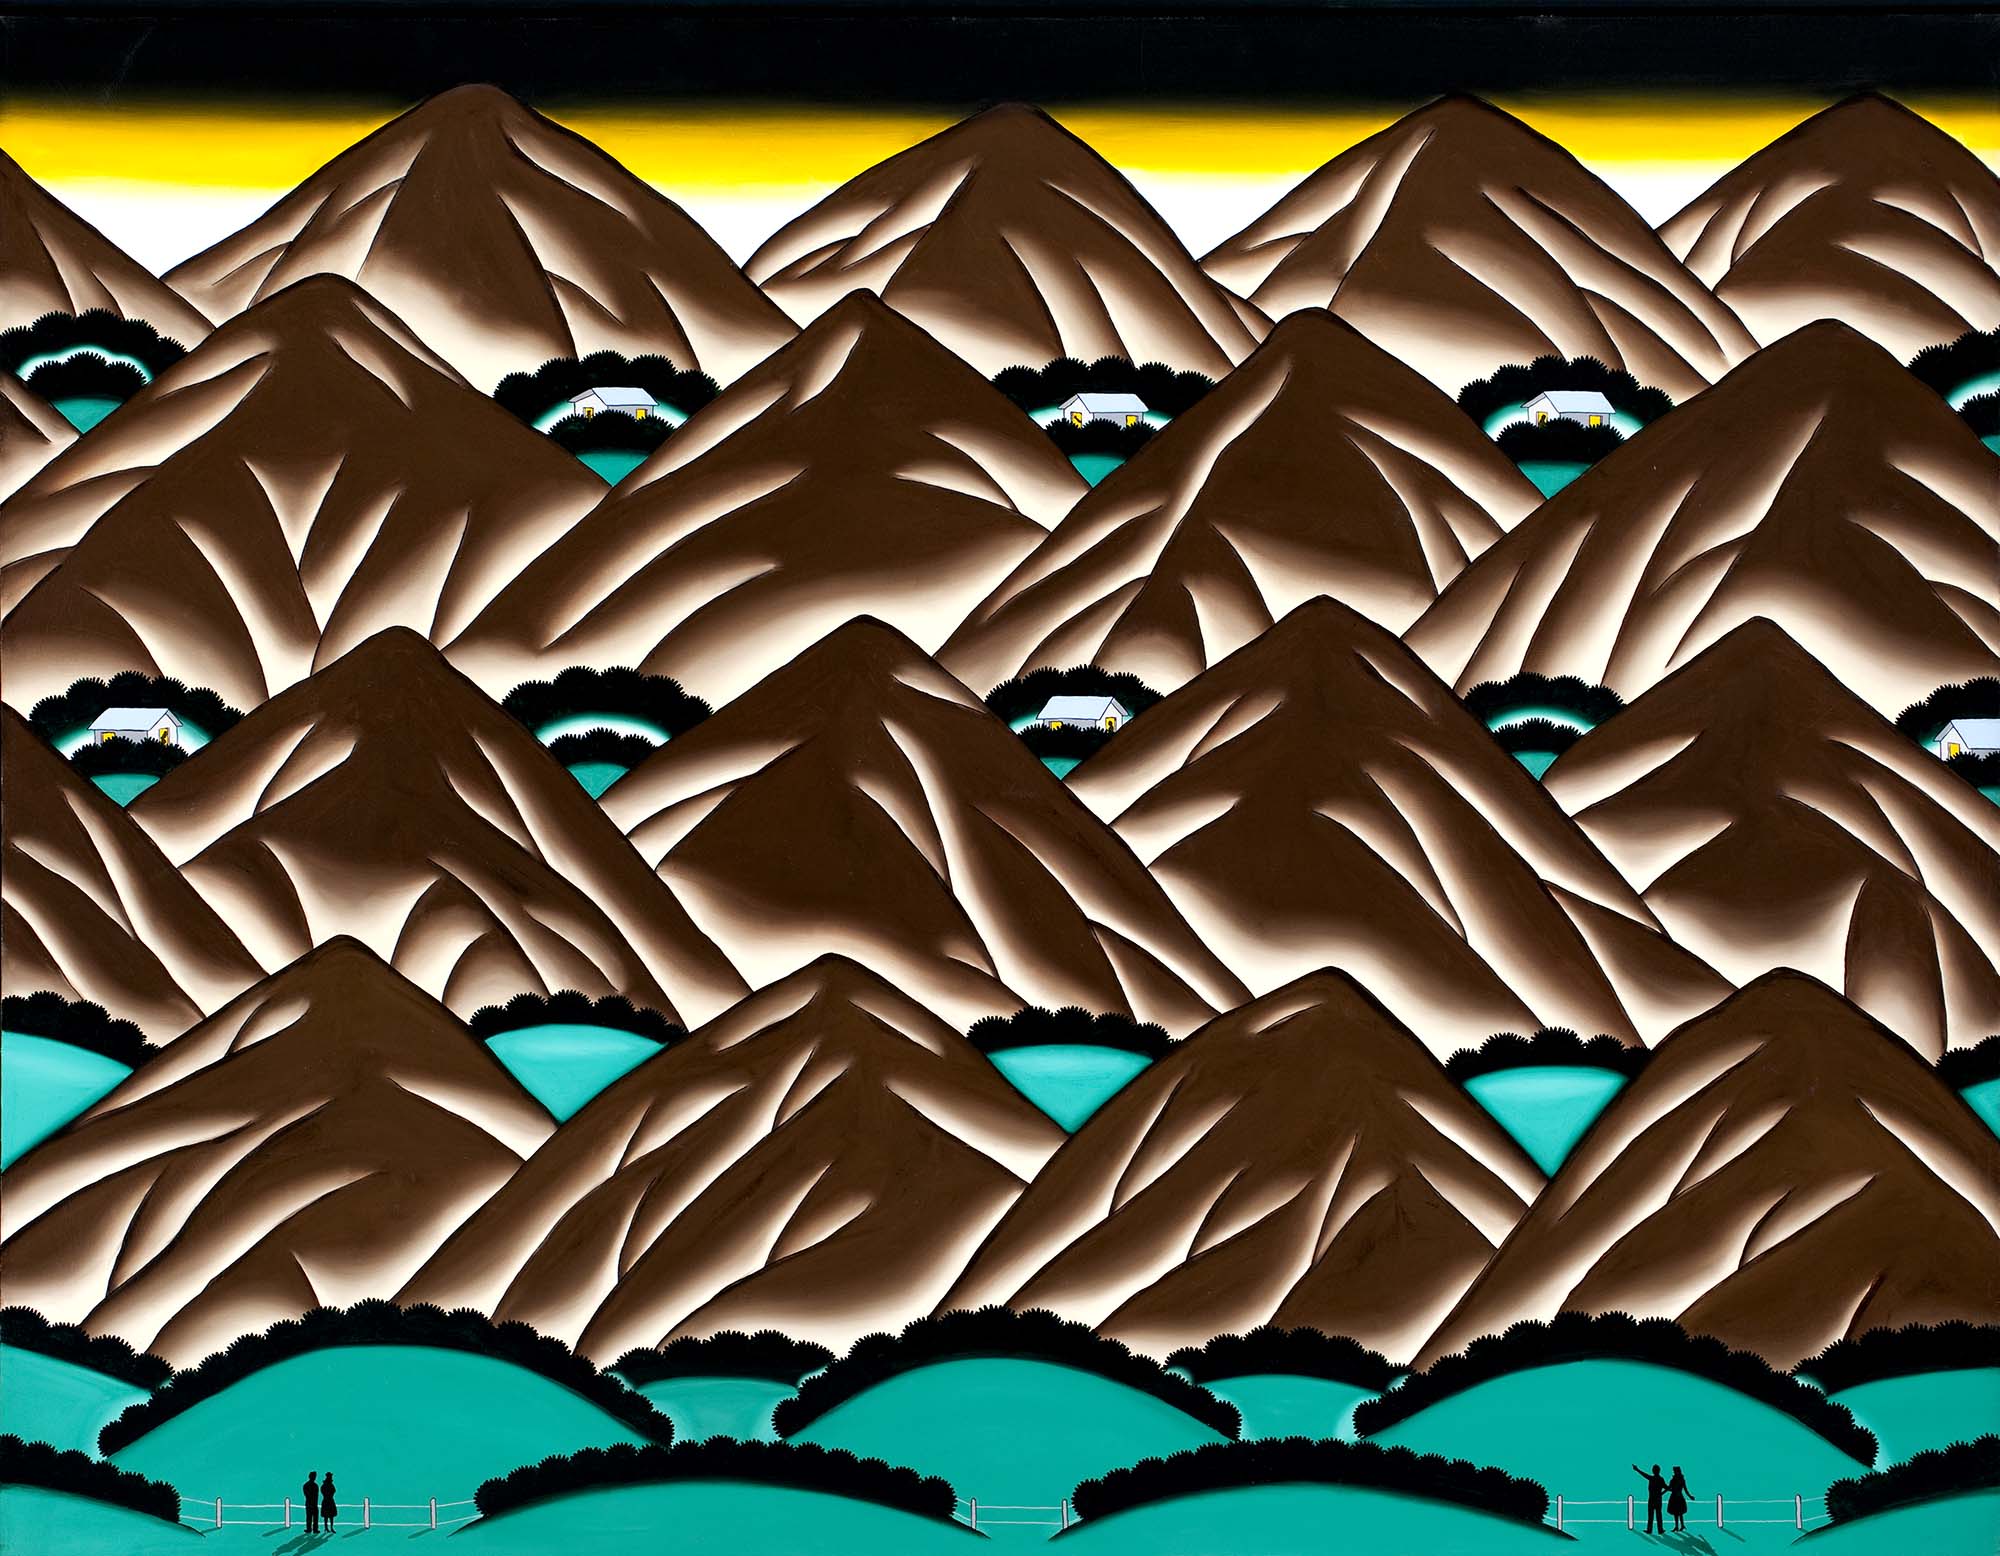
Sudden Avalanche, 1972, oil on canvas; Mountain Sites, 1973, oil on canvas
Subjects
Visual Art, Language Arts, Social Studies
Author
Kristine Gruninger, art educator
Essential Questions
How do artists use art elements and art techniques? How does knowing and using visual art vocabularies help us understand and interpret works of art?
Grade Level
5th grade
Objectives
Students will learn the split fountain printing technique, reinforce elements and principles of design with focus on shape, color and pattern, and show a relationship between humans and nature in a landscape.
Activity
This activity focuses on the use of repeated shapes to reinforce pattern and composition in a landscape. Students will learn the split fountain printing technique, reinforce elements and principles of design with focus on shape, color and pattern, and show a relationship between humans and nature in a landscape. Introduce Mountain Sites and Sudden Avalanche by Roger Brown.
Discussion Questions
- What do you notice about these two works?
- How did Roger Brown use proportion and color? What do you think he was trying to show us by this?
- Do the images in the background seem farther away than the ones in the foreground? How has the artist achieved this effect? Explain your thoughts.
- Where is the light the brightest?
- Imagine yourself being in one of these paintings, looking at the scene before you. Do you think Roger Brown wanted us to feel something about what we are seeing? What clues did he give us to help us know what that might be?
Instructions
Part 1: Split Fountain Printed Background
Materials
12 x 18-inch sheet of white paper, brayers, ink plates, white printing ink and colored printing inks
Place some colored ink off center on the inking plate. Place some white ink about an inch over from the colored ink. With the brayer, roll back and forth over the colors until they start to blend in the middle of the brayer, covering the brayer evenly. The brayer should have colored ink on one end of it, white ink on the other end, with a blend of the two in the center.
Roll the brayer across the middle of a vertical 12 x 18 piece of white paper. The brayer may need to be loaded with more ink for even coverage.
With a clean brayer and ink plate have one half of the class squeeze colored ink on their plate and the other half squeeze out white ink on their plates. Later, they will switch plates and brayers to minimize sink time.
Have the students who rolled out colored ink overlap their inked brayer with the colored edge printed on their paper. Roll the ink across the paper until evenly covered. Continue rolling color all the way to the top of the paper until it is evenly covered.
Continue the same process with the other half of the class who rolled out white ink. Have them roll the ink to cover the paper to the bottom edge. Switch plates and brayers to complete the printing process.
Part 2: The Landscape
Materials
9 x 12-inch sheets of black, white and colored construction papers, pastels, and glue sticks
At this point, all images will be constructed by using repeated shapes. For example, one shape is repeated for the windows, one for the clouds, etc.
Glue a strip of paper for the ground onto the dry background.
Cut shapes for a building/tower. Assemble.
To make windows the same, cut out one to use as a template or measure them. Glue and set completed building aside.
Cut out one cloud and use it to trace all others. Smudge pastel around the edges and cut out. Glue to the background.
Create a tree by repeating the shapes. Glue together.
Assemble all pieces onto the background.
Finally, create and glue down people or draw them directly onto the paper with a Sharpie.
Adaptations
The background could be adapted for younger students by using watercolor washes or by blending pastels.
Concluding Discussion
- Discuss how the printed split fountain technique brings light to the background of students’ art
- Explain how proportion and repetition help create the impression of shallow depth in a landscape
- Encourage students to tell a story about the people and nature in their landscape paintings
Materials
12 x 18-inch sheet of white paper, brayers, ink plates, white printing ink and colored printing inks; 9 x 12-inch sheets of black, white and colored construction papers, pastels, and glue sticks
Extensions
Language Arts, Social Studies
Standards
National Core Art Standards
VA:Cn10.1.5 / VA:Cr2.1.5 / VA:Pr6.1.5 / VA:Re8.1.5
Common Core State Standards
English and Language Arts: CCSS.ELA-LITERACY.SL.5.1.C, CCSS.ELA-LITERACY.SL.5.2, CCSS.ELA-LITERACY.SL.5.5
Wisconsin State Standards
Social Studies: A.4.4