

Lesson Plan | Nancy Mladenoff: Aerial Views and Flying Vehicles – MMoCA
Artwork
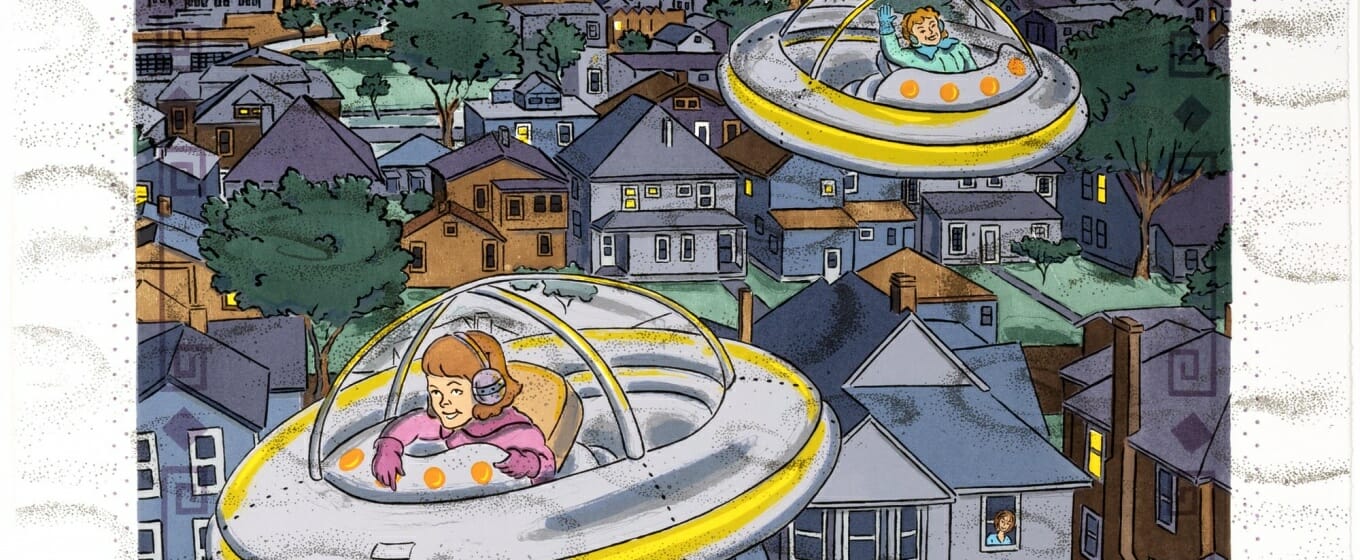
Cityscape, 1998, relief and lithography
Subjects
Visual Art, Social Studies
Author
Ruth Vander Horck, art educator
Grade Level
5
Objectives
- Students will explore non-traditional gender roles as possibilities for their futures as well as gain a historical perspective of the time period during which this work was created. Students will explore the concept of an aerial view of the landscape of their neighborhoods. Students will use overlapping to create an illusion of space or perspective in the placement of their print on their drawing. Students will explore printmaking using a Styrofoam plate (Styrofoam Scratch Board), a brayer and printing ink.
Activity
After observing and discussing Cityscape by Nancy Mladenoff, students will draw an aerial view of their community or neighborhood using Google maps, Google Earth or aerial photographs from the internet. After discussing aerial modes of transportation students will draw themselves in charge of a flying vehicle. This drawing will be transferred on to a piece of Styrofoam Scratch Board making a printing plate that will be printed on to the drawing.
Discussion Questions
- What do you notice about Cityscape? Discuss the print in terms of line, shape and form.
- Look at the style of this print. How would you describe the style to a person who couldn’t see it?
- What time of day is it and how do you know this?
- What is happening in this print that is unusual?
- What is the perspective or vantage point of the viewer?
- Who are the characters in this picture? What do you think they are thinking and feeling?
- At what time period in history do you think this story is taking place?
- What is the setting? Is it suburban, rural or inner city?
- How were things different for girls during Nancy Mladenoff’s childhood in the late 1950s? What sort of activities or adventures have been traditionally thought appropriate for girls and for boys? Are they the same or different? Discuss social norms, gender roles and what people might expect of a person based on their gender.
- What is the setting of your neighborhood?
- What sort of flying vehicle could you imagine piloting above your neighborhood?
Instructions
Tell students briefly about Nancy Mladenoff. She is from Hurley, Wisconsin, and was born in 1957. Hurley is a small town in northern Wisconsin surrounded by lakes, ponds and woods. Many of Mladenoff’s works include images of fishing and other outdoor activities. She received her undergraduate degree from the University of Wisconsin, Madison, and an Master of Fine Arts from the School of the Art Institute of Chicago. She recently retired from the art department at UW-Madison.
Students will need pencils; erasers; 12 by 18-inch 80# white drawing paper (cut paper to 11 by 17 inches if you think you might make copies of the printed version for your student to paint later); fine-tipped Sharpie markers; newspapers for printing station; 6 by 9-inch Styrofoam printing plates (Scratch-Foam); black water-soluble printing ink; brayers; Plexiglas or an old lunch tray to roll ink; watercolors; and brushes.
Prepare supplies and download Google Earth Maps App on iPads. Print photographs of your community from an aerial view. Search drones, spaceships, rockets, airplanes and hot air balloons and print out images for students, or have students use Chromebooks or iPads to search Google Earth or use the Google Earth app if they are available at your school.
Tell the students that they will draw their neighborhood in pencil and then outline it with a fine-point Sharpie marker. Students should search for their home address on Google Earth Maps so they can see the aerial view of their neighborhood. The teacher can also provide copies of aerial photographs of the students’ community.
Students should use a pencil to draw their impressions of the aerial view of their neighborhood at their developmental level. After their composition is laid out in pencil, they should use a black, fine-point Sharpie marker to draw over their pencil lines. They are ready to print on this image when the aerial-view drawing is completed.
Students will now start the printing segment of this lesson plan. On a sheet of photocopy paper students will sketch ideas of themselves from an aerial perspective as they fly above their neighborhood. What would their mode of transportation be? A spaceship, a butterfly, a drone, a hot air balloon?
After drawing themselves in their vehicle they will tape the image to the Styrofoam plate. Using a ball-point pen, students will carefully trace all of the lines in their drawing, pressing firmly to etch the drawing into the Styrofoam. Alternatively, students can draw the image of their vehicle directly on Styrofoam with a ball-point pen.
When the Styrofoam etching is completed, the extra Styrofoam should be cut away. The cut should be just outside the etched line, which is sometimes called a “shadow cut”. Students should then use masking tape to form a handle in the shape of a loop and attach it to the back of the Styrofoam printing plate. Students will use the handle later to release the print.
With teacher assistance, the front of the Styrofoam plate should be inked using a brayer and water-based block printing ink. First, roll out an even layer of ink on an old lunch tray or a similarly sized piece of Plexiglas. Next, roll the brayer over the ink to transfer an even, tacky layer of ink from the plate to the brayer.
The next step is to transfer the ink to the printing plate. Place the Styrofoam plate face-up and apply the ink by rolling the brayer over its surface. Then position the Styrofoam inked-side-down on the front of the aerial view drawing. Then flip the paper over and rub the back where the Styrofoam is placed, using fingertips to press firmly and evenly. After every inch of the plate has been rubbed, flip the paper over and use the masking tape handle to release it from the paper.
Watercolor can be added to bring color into the image either before or after the printing process.
Standards
National Core Arts Standards
Anchor Standard 11, VA: Cn11.1.5a